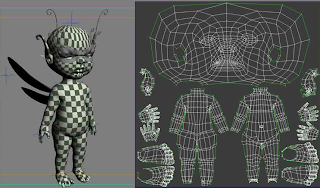
i explained before that i will be continuing with this blog with more characters to be UV mapped.
my next challenge is to unwrap a character made by my friend.
i will be starting this as soon as i get a bit of time.
here's the model
Monday, 27 December 2010
Saturday, 18 December 2010
first UV mapped character
for my first ever UV mapped character i am fairly pleased.
especially with the body. as you may have seen i had major problems with the head, this was due tot the fact it is a sphere, trying to flatten and unwrapped a sphere is impossible without either seams of serious stratching which is a shame because it is the only glaringly bad part of this map. like i've it is something i can come back to at a leter stage and hopefully sort out once i become a little bit more confident with my skills.
i have enjoyed UV mapping so far, it seems to be both extremes. at times it can be very easy and strangely simple but at others it can be the biggest pain in the arse and prove very difficult and stressful. so far in this blog i hope you have seen me develop some skills, going from pretty much no knowledge of it at all to at least attempting to UV map a character.
it was never something that caught my eye but now i have tried it it's deffinitrly something i will be paying more attention to as time goes on and i will be carrying on with this blog and challenging myself with new models to UV map.
Monday, 13 December 2010
part 2
I've carried on with the unwrapping of moom
in my last post i had shown i how far i had got, i had done the arm/hand and leg/foot
i am pleased to announce i have finished.
it wasn't the easiest thing i have ever done and i haven't got the best results but it's definitely something i can work on at later date.
next step was to do the main torso. this wasn't too hard. the model not being the most detailed in the body made it slightly easier for me.
as you can see this quite nice, all pretty smooth and the UVs flow nicely which will hopefully show when the checker is applied.
next job was to do the head, tongue and eye socket.
the head gave me real grief... it being a sphere proved very difficult. this was easily the hardest part of the model. you can see how difficult i found it when looking after i applied the checker texture. It was hard not have blatant seams... i think this might be why he is only flat colours and not textured, but who am i to say that? it's just my theory.
i tried a couple of different ways, like having it more vertically set out but i finally settled on having more even throughout, as wide as it is high. as you can see in the above image.
the final two parts i had to do were the eye socket and the tongue.
the tongue mainly staying within the model meant i could do the seam down one side.
and the socket was almost done for me, the rough outline was there i just had to piece in the circles inside each other.
so this completes my unwrapping of moom
next is to apply the checkerboard texture and see how its gone.
as you can see it's all pretty even throughout the body and stuff but the main problem just like i said was with the head.
here are some images of what i am talking about.
the front isn't terrible but could definitely be better.
the back isn't as good...
as you can see there is serious stretching and the seams are very visible. like i said this is something i can work towards to improve at a later stage.
in my last post i had shown i how far i had got, i had done the arm/hand and leg/foot
i am pleased to announce i have finished.
it wasn't the easiest thing i have ever done and i haven't got the best results but it's definitely something i can work on at later date.
next step was to do the main torso. this wasn't too hard. the model not being the most detailed in the body made it slightly easier for me.
as you can see this quite nice, all pretty smooth and the UVs flow nicely which will hopefully show when the checker is applied.
next job was to do the head, tongue and eye socket.
the head gave me real grief... it being a sphere proved very difficult. this was easily the hardest part of the model. you can see how difficult i found it when looking after i applied the checker texture. It was hard not have blatant seams... i think this might be why he is only flat colours and not textured, but who am i to say that? it's just my theory.
i tried a couple of different ways, like having it more vertically set out but i finally settled on having more even throughout, as wide as it is high. as you can see in the above image.
the final two parts i had to do were the eye socket and the tongue.
the tongue mainly staying within the model meant i could do the seam down one side.
and the socket was almost done for me, the rough outline was there i just had to piece in the circles inside each other.
so this completes my unwrapping of moom
next is to apply the checkerboard texture and see how its gone.
as you can see it's all pretty even throughout the body and stuff but the main problem just like i said was with the head.
here are some images of what i am talking about.
the front isn't terrible but could definitely be better.
the back isn't as good...
as you can see there is serious stretching and the seams are very visible. like i said this is something i can work towards to improve at a later stage.
Sunday, 5 December 2010
its been a while
sorry it has been a while since my last post, i am honestly finding it hard to do both sets of work let alone keep up with the blogs for both as well.
I've had to rethink a few things with my other project which has just been playing on my mind...
anyway, no excuses! I'm back!
so last time i posted i said i would be unwrapping Moom.
here's our guy
i started to UV map moom, just like my hard surface mapping i decided to cut down on the confusion i would map only half the character then when i mirror it it will mirror the UVs.
i decided to use automatic mapping to split it all up so i could then piece it all back together manually.
this is what i initially got
so not particularly messy just a bit bitty and cut up in places (mostly head area).
from what i had learnt from my research i decided to do it in stages, separate the UVs for the torso, the arms, the legs and the head. yes wherever they are split there will be a seam but hopefully it being in these areas it wont be to obvious.
i started out doing the leg and foot.
the seams for this would be where the sole of the foot meets the edges of the foot and then the inside leg. this is because they are the least visible areas on this part of Moom.
the UV looks like this.
next up was the arms, the process was very similar to the one for the legs. the seams being where the palm meets the edges of the hand, just like the sole of the foot.
the other being on the inside of the arm.
the arm/hand were a bit more fiddly than the leg and foot. mainly because of the little bits in between the fingers etc not being connected, i had to sew them into place piece by piece at some points which was pretty long and monotonous.
so far this is all i have done but i will be continuing it asap.
Saturday, 27 November 2010
organic UV mapping
so i have looked on some forums and a couple of websites and youtube at peoples examples of UV mapping a character.
just like hard surface mapping you want the checks to be as square as possible and the more even the better.
and also like hard surfaces you want to have as little seems as possible in the most hidden areas of your model.
here are some of images of examples of work
this is a final UV map for this character i found on someone blog
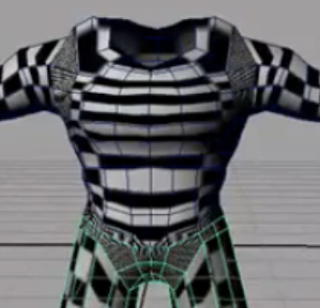
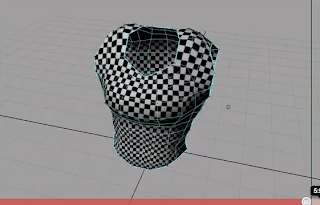
these are screen shots from a youtube video i watched.
in this image you can see the checks are stretched over the chest of the character this before he has used any type of mapping.
this is the final checkered torso of the character, as you can see its pretty much even all over apart from the top of the shoulders which he describes as not major.
these tutorials have been pretty useful with just familiarizing myself with the job ahead of me.
i have decided to go for good old moom
i have used moom a few times on different projects, i think a lot of people have...
i will be UV mapping as soon as i get some of my other project out of the way.
Wednesday, 24 November 2010
next stage
right, im not saying i am now a pro at UV mapping but i have done a few hard surfaces now, not that they've been the hardest surfaces to map but i've given it a go and the results i am pretty pleased with.
i think i might be time for to try to do some organic mapping. i only say this because it's so much harder and i think it would be beneficial if i tried to do both. so atleast i have an idea of how both ways work.
my plan is to look at some examples of peoples work, read up on how theyve done it. then go for it.
Thursday, 18 November 2010
archway
i was thinking to myself, what could do i UV map now?
so i went with the idea of an archway, quite an old looking archway that would be made from stone.
so to start with i had to model it
this was my first my mistake, i modelled the whole thing then tried to UV map it...it was horribly messy and overlapped, it was proving to be confusing.
so i decided to try it again just modelling one half.
instead of mirroring the first half of the model straight away to complete the model, i purposely left it so when i UV map this side then mirror the geometry the mirrored side will mirror the UVmap also. which overall would save time and would make sure that both UVs are even.
as you can see in this image i have mirrored the geometry and the UV has stayed the same which means that to will be mirrored
just like before the next stage is to check if its all even by applying a checkerboard texture.
the initial size of the checker was too large and was hard to tell whether it was equal or not.
so i turned the number of checks up in its option panel.
this would make it easier to tell whether its even or not for the final texture to be assigned.
When mapping the arch i made sure the seams of the map were round the back of the model where it would be connected to a wall so there would be no visible joins.
as you can from the last picture above it's all pretty even, the only problem i have with it is because its mirrored the check on the top brick looks a bit stretched compared to some of the others but i think because it is mirrored it wouldnt be visible when textured.
Friday, 12 November 2010
time for something a little bit more complicated
so my last post was of UVing a cube which is ridiculously easy
for my next test to develop my skills further i have gone for a stranger shape.
for this i was sure which type of UV to create, i was torn between automatic or spherical mapping. i asked Fahran, a guy on my course who i knew knew about UV mapping, he suggested automatic so i went along with his suggestion.
the initial map was pretty split.
it was time to use some of the tools in the UV texture editor panel.
there are 3 main tools i will be using throughout this unit which are:
move and sew the selected edges
Seperate the UVs along selected edge
unfold selected UVs
so here is what i got from automatic mapping
i will now use the 'move and sew' tool to connect as many of the edges so to have as little seems as possible.
the shape i used was just an altered cylinder and the top and bottom were still flat circles. i wasnt sure whether to connect each triangle segment to the main set of UVs because that would leave a large number of seems, but on the other hand if i kept them together then there would be one big seem going around the top edge of the shape.
so i went back and asked Fahran for his advice, he said just to leave it as a circle for now...it all depends on how it's being textured.
as you can see in the last image i posted the UVs are quite uneaven in places, and quite drastically in certain areas. so this is a good place to use the unfold tool. this helps to even out the UVs.
this is my finalised UV map for this shape. i applied a checkerboard texture to it to make sure the UVs were similar.
You do this so you can check that all the squares are as even as possible, if some are bigger than others then when the texture is applied it will stretch. It also helps with locating the seam of the object.
as you can see from mine all the squares are pretty even with no glaringly obvious different in their sizes, this means when a texture is applied it should be even all over.
Wednesday, 10 November 2010
learning
I have a rough idea how to do UV mapping but the whole point of this unit is to get better at something i havent really done before.
so where to start? why not some tutorial videos?
i downloaded some video tutorials by 'poly face' (http://poly-face.com)
in these videos he doesnt explain too much about the whole theory behind UV mapping but instead takes you step by step on how to UV map a hard surface toy bike.
the bike is quite low detail.
the good thing about these videos are the fact he uses a couple of different mapping tools, planer, automatic and cylindrical mapping all on one object. He briefly explains them all.
this helped me get more of an idea of what i would need to do when trying to UV map.
and some of the tools i will be using which i will explain at a later date.
after i did the cube i felt like i should now try something a little harder.
Sunday, 7 November 2010
UV-ing a cube
right
i am starting from the bottom so why not start with the most simple shape? a cube!
so i create a cube in maya
next i use automatic mapping, i do this because it maps it from 6 sides, my cube has 6 sides so makes sense.
i then open my UV texture editor window and it looks like this.
not much to map here, due to the simple shape when i created the UVs the work was done for me.
i decided to play around with it and added a bump map of some wood, i did this because at a later date i will be uv mapping and texturing a bench for my other unit so thought this might be good practice. i got a 2d wood image of google (when i do it for the bench i will be creating my own texture).
obviously because i only used one image, the markings repeat on each side of the cube, ignore that and look at the nice bump mapping :)
bump mapping is essentially taking a 2D image and making the darker and lighter parts of the image react to the light placed in your scene. it gives the effect of 3D.
there wasnt much i found difficult in this test, i think maybe i shouldn't have wasted my time... oh well got to start somewhere i suppose.
the main problem i discovered was that the texture image i used was slightly wonky, this made some of the lines in the panels of wood not match up on the edges quite right.
this can be solved by taking and editing my own texture images.
Thursday, 4 November 2010
what i've found so far
i would firstly like to say i will primarily be looking into hard surface uv mapping.
this is only because i have heard it's slightly easier so as a beginner i thought it might be a good place to start.
by hard surface i mean anything that isn't organic.
so what is uv mapping?
once a 3D model is made it has its own polygon mesh, this is made up of all the edges and faces just like normal shape but a bit more complex. e.g. a cube has 12 edges and 6 faces.
UV mapping is the stage before 'texturing' (the applying of an image on a surface). So to allow the texture artist to easily paint the mesh it has to be mapped out.
UV mapping is the process of unwrapping the 3D mesh of a model down flat then connecting the edges to make as little seams as possible, the more seams the harder it will be to texture.
To get the initial UV map you select model you want to map, then click create UVs.
there are a few different ways of getting your initial map. It usually depends on the shape of the model when deciding what type of UV to create.
chosing what mapping you choose is crucial. basically what it is is the angles that the model is unfolded from if that makes sense?
e.g. automatic mapping is from 6 different areas, top, bottom and all four sides. Spherical mapping instead of unwrapping from such rigid angles tries to do it from all angles and unwrap it slightly smoother.
automatic mapping
spherical mapping
a little clearer?... hopefully as i go on it will explain itself... lets hope so anyway.
there is also planer mapping which is just from one angle, this would be good for this such as walls etc.
and cylindrical mapping which is quite self explanatory considering the other ways of mapping i have described.
so like i said i am a beginner so will start at the bottom and try work my way up from that and do some slightly more interesting models.
Friday, 29 October 2010
seperate unit
so this is my first term of my final year at Ravensbourne College and along with my main unit which carries on throughout the year i have a second unit, 'advanced research'.
what i have to do is either push a skill that i am confident with or look into developing skills in an area i haven't before.
my initial thoughts are to start looking at developing a new skill, i have never really looked at UV mapping before, so i think it might be useful to try to gather this new ability.
People have told me its quite tricky but i am more than willing to give it a go.
Subscribe to:
Posts (Atom)